





Good security lighting makes the scene easier to read. It puts usable light on entrances, paths, gates and other observation tasks while limiting glare, deep contrasts and spill. Adding more output is not automatically the right correction.
Start with the observer: a person approaching an entrance, a driver entering a yard, or a camera viewing a gate. They may be looking in different directions and need different information from the same installation.
Draw the viewing task before selecting the fixture
Mark where the observer stands, what must be recognized and which background sources appear in the view. Include changes in direction and transitions between lit and darker areas.
A plan of light on the ground is useful, but it may not explain how well a face, sign or gate can be seen. Where those vertical tasks matter, include appropriate vertical-plane review and field observations with the designer.
Compare two approaches to the same gate
Illustrative design discussion: an entrance is difficult to observe after dark. The example below compares review approaches; it reports no measured result and promises no security outcome.
| Approach | What to examine |
|---|---|
| Increase the existing fixture’s output | Does useful light improve at the observation task, or does the source become more prominent in the viewer/camera image? |
| Change placement, aiming or distribution | Can the task receive the required light with less direct source visibility and less spill? |
| Adjust the operating plan | Do schedules or supported controls match actual access hours without compromising a required task? |
Test the alternatives against the same observer positions and site conditions. Otherwise, a brighter-looking photograph can be mistaken for an improved view of the thing that matters.
Review four parts of the scene
- The task: what needs to be seen or recognized?
- The source: is a bright aperture in the viewing direction?
- The transition: what happens as a user moves between bright and darker areas?
- The boundary: where does light go beyond the property or activity area?
Check nearby windows, roads and habitat-facing boundaries as well as the site itself. A solution that improves one view can create a problem in another.
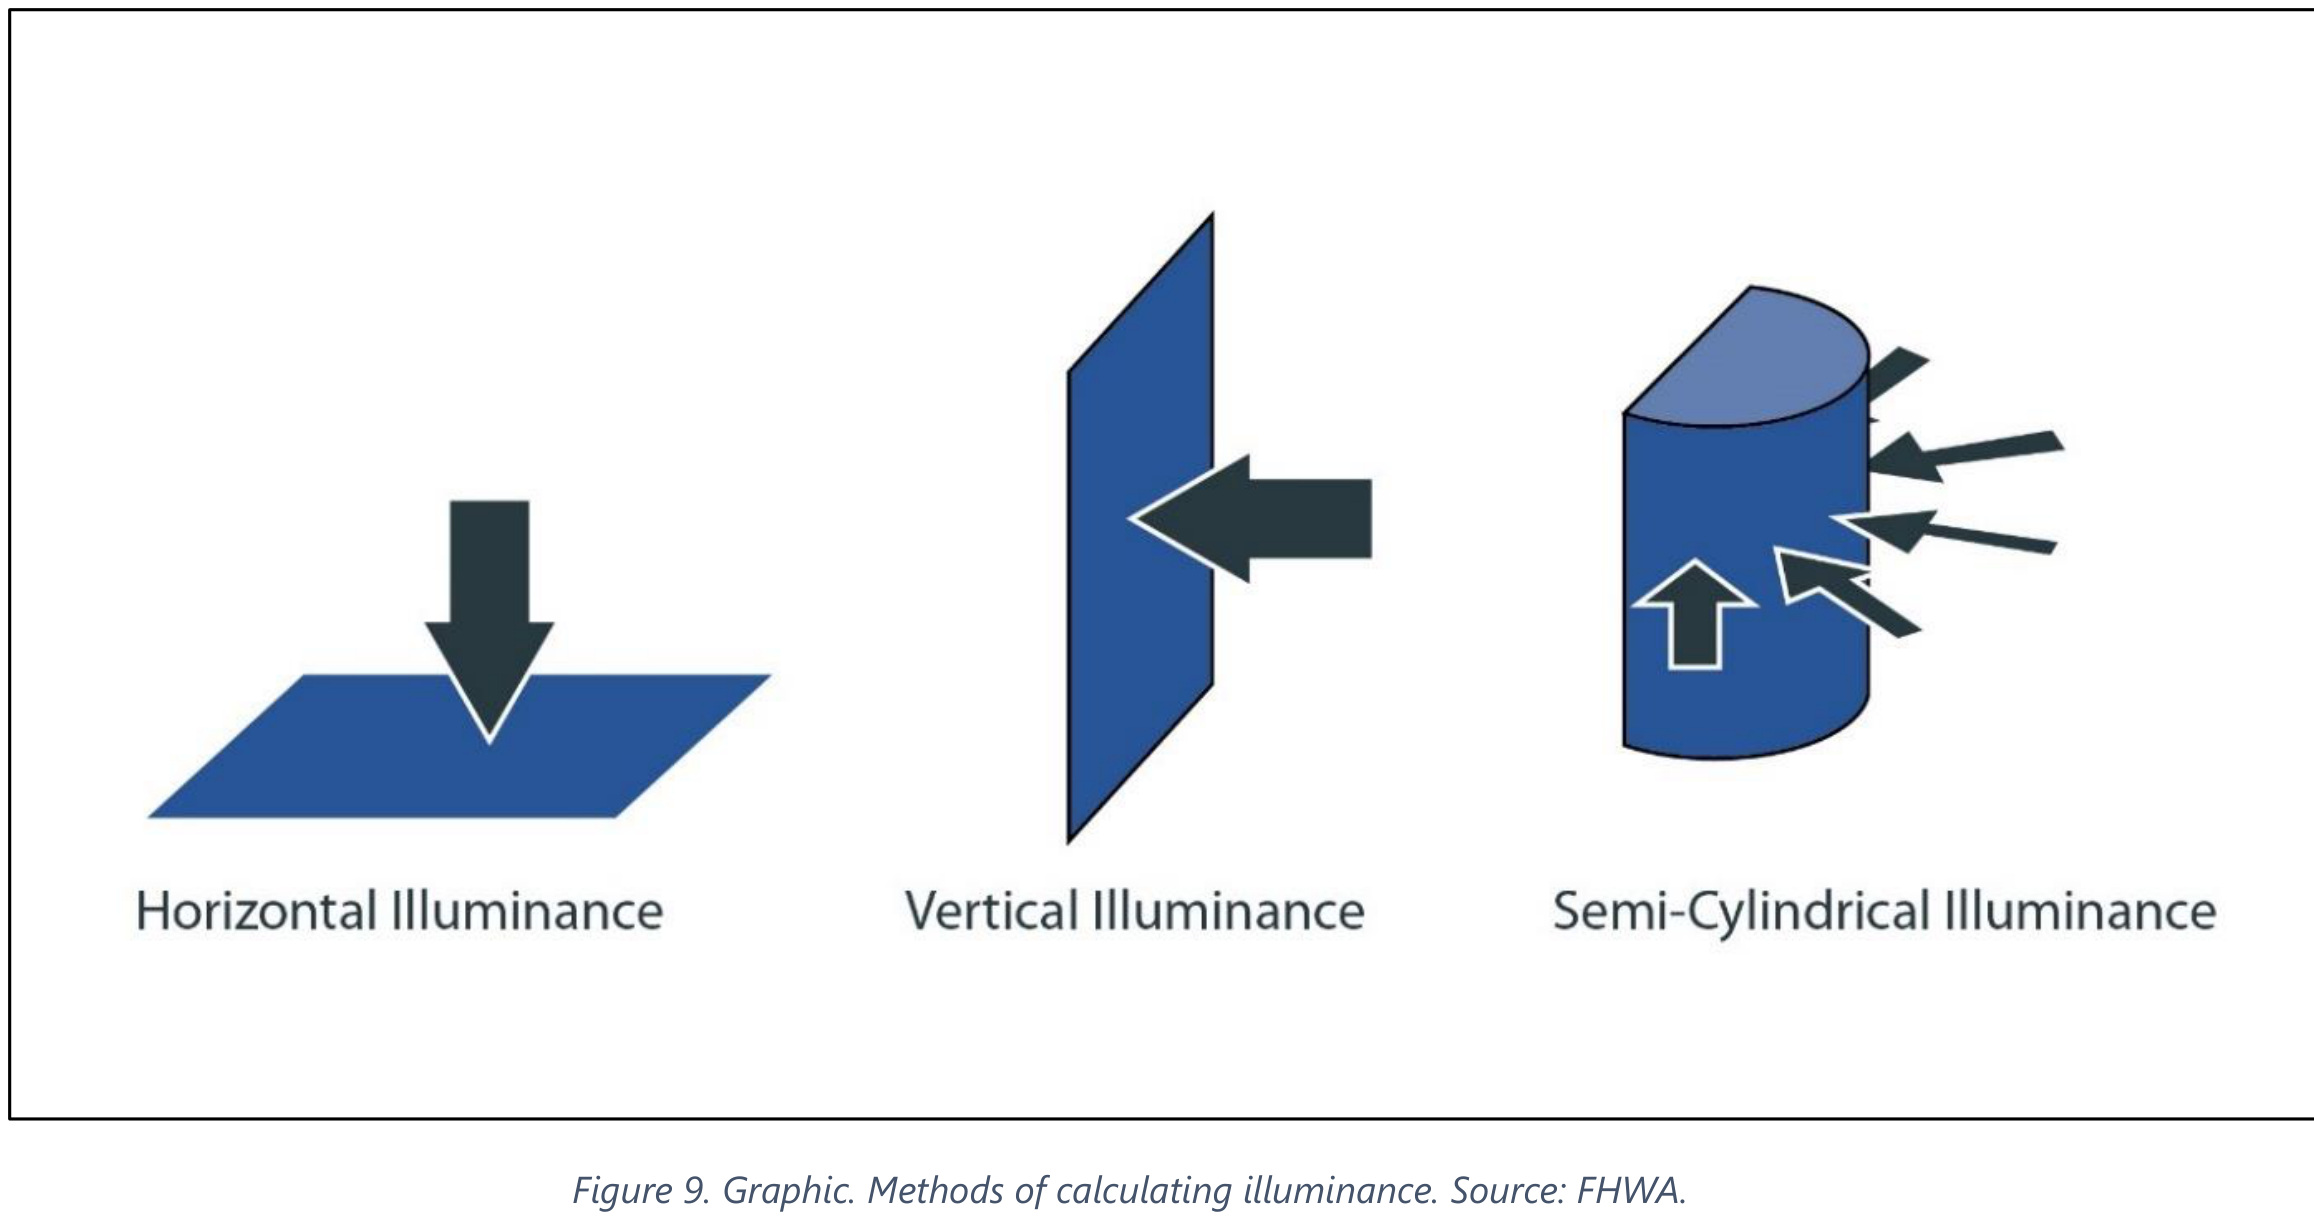
The three receiving planes in FHWA Figure 9 explain why a bright pavement reading does not establish how much light reaches a person facing an approaching driver. Keep the measurement plane and direction with each lux result. Semi-cylindrical illuminance is another defined geometry; it is not a conversion factor that turns one horizontal reading into a complete pedestrian assessment.
What belongs in the photometric review?
Use the proposed fixture’s matching photometry, mounting height, orientation and relevant accessories. Identify the calculation surfaces and criteria, including the vertical tasks and boundary conditions that matter to the project. Record the assumptions about surrounding light and operating settings.
The review should explain why the proposed layout supports those tasks. A catalog lumen value or generic “security” label does not do that work. DOE’s lighting-quality material provides broader context for considering lighting quality alongside output.
Use the actual camera and nighttime view at commissioning
Where a camera is part of the security plan, have the responsible team check the installed scene through that camera under its intended settings. Do not infer image quality from a lighting rendering alone.
Walk the approach routes, inspect the required observation points and check the boundary. Record aiming, controls and any corrections. Repeat relevant checks after fixture replacement, changed operating hours or a change to the surrounding scene.
Lighting supports observation within a wider security plan; it does not by itself establish crime prevention or personal safety.
The brightest pavement can coexist with a poorly revealed person
A ground-level calculation describes illumination on its stated plane. A guard or camera may need information from a person's face, clothing or body viewed against a background. Those surfaces and viewing directions are different. Adding light to the pavement does not automatically establish useful light on the target, nor does it establish adequate contrast from the observer's position.
FHWA’s Research Report: Street Lighting for Pedestrian Safety reproduces paired photographs credited to Gibbons, Edwards et al. (2008). They illustrate negative contrast, where the person appears darker than the background, and positive contrast, where the person appears brighter. The roadway example helps explain the visual mechanism; it does not establish a required design level for a private property.
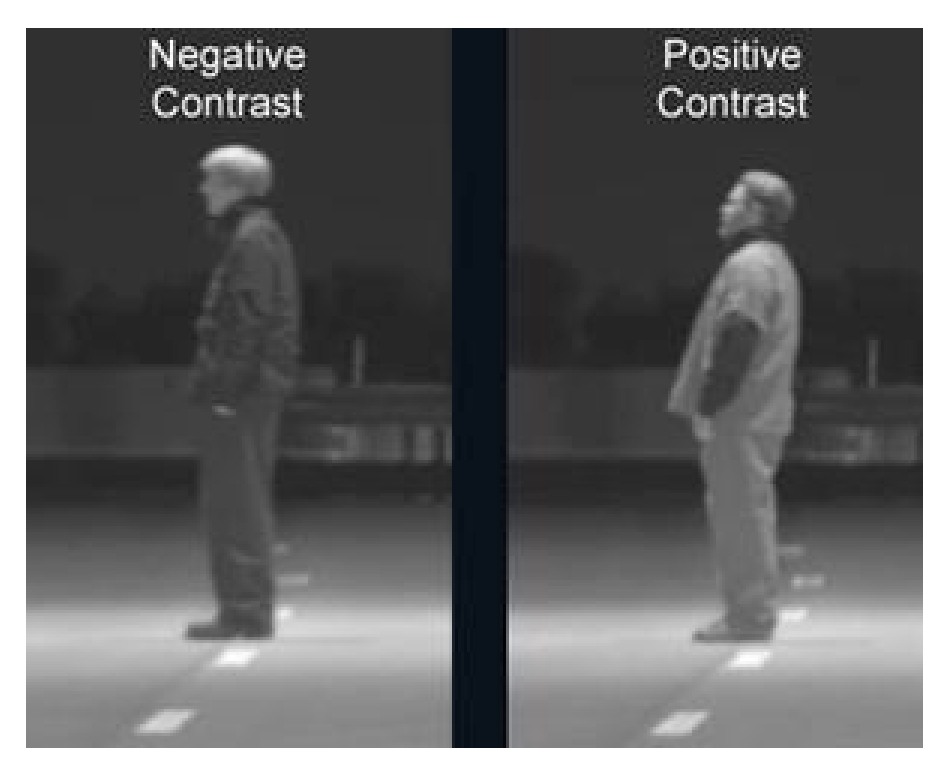
Read the pair by comparing the person with the immediate background. In negative contrast, the person is darker; in positive contrast, the person is brighter. Neither label guarantees adequate recognition on its own. At commissioning, inspect the actual approach direction and backdrop rather than inferring the result from pavement brightness.
These research photographs illustrate contrast polarity. They do not isolate the effect of glare or establish a camera’s exposure, usable facial detail or recognition performance. Keep the human observation and the project camera check as separate acceptance tasks.
The important observation is that visibility is relational. Target appearance, background and viewing position belong in the same discussion. A fixture can make an area look dramatically bright in a promotional photograph while leaving a relevant face in shadow. Review the actual viewing task rather than assuming that a bright image is a completed security design.
Glare can come from the source while the calculation grid looks acceptable
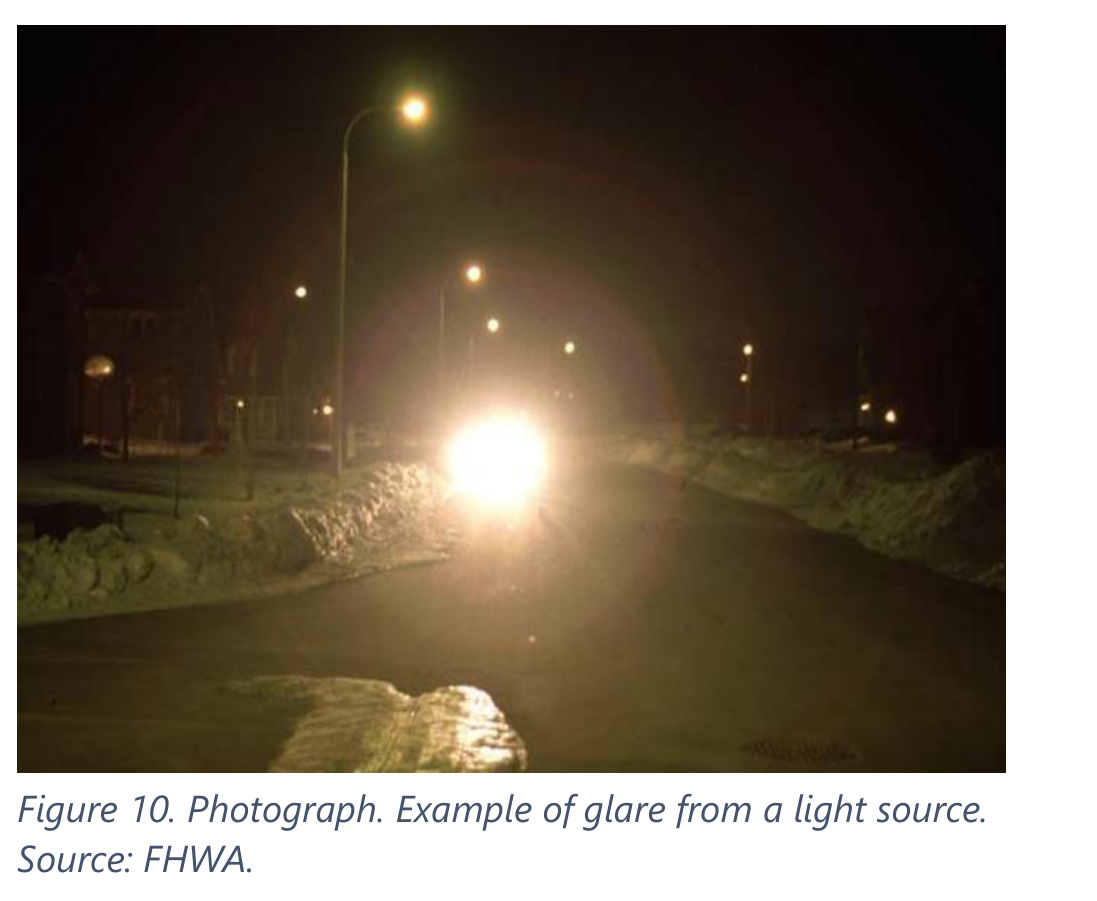
FHWA’s photograph makes the observer’s problem visible: a bright source occupies the view while details around it are harder to judge. It is an illustrative roadway scene, not a LEOTEK installation, a measured glare comparison or a security-camera test. Use it to identify the viewing problem, then check the actual site’s source position, optics and observation task.
The photograph complements the schematic below. It cannot provide a glare metric from image brightness alone; exposure and display settings also influence its appearance. Record those settings when using site photographs to compare a proposed correction.
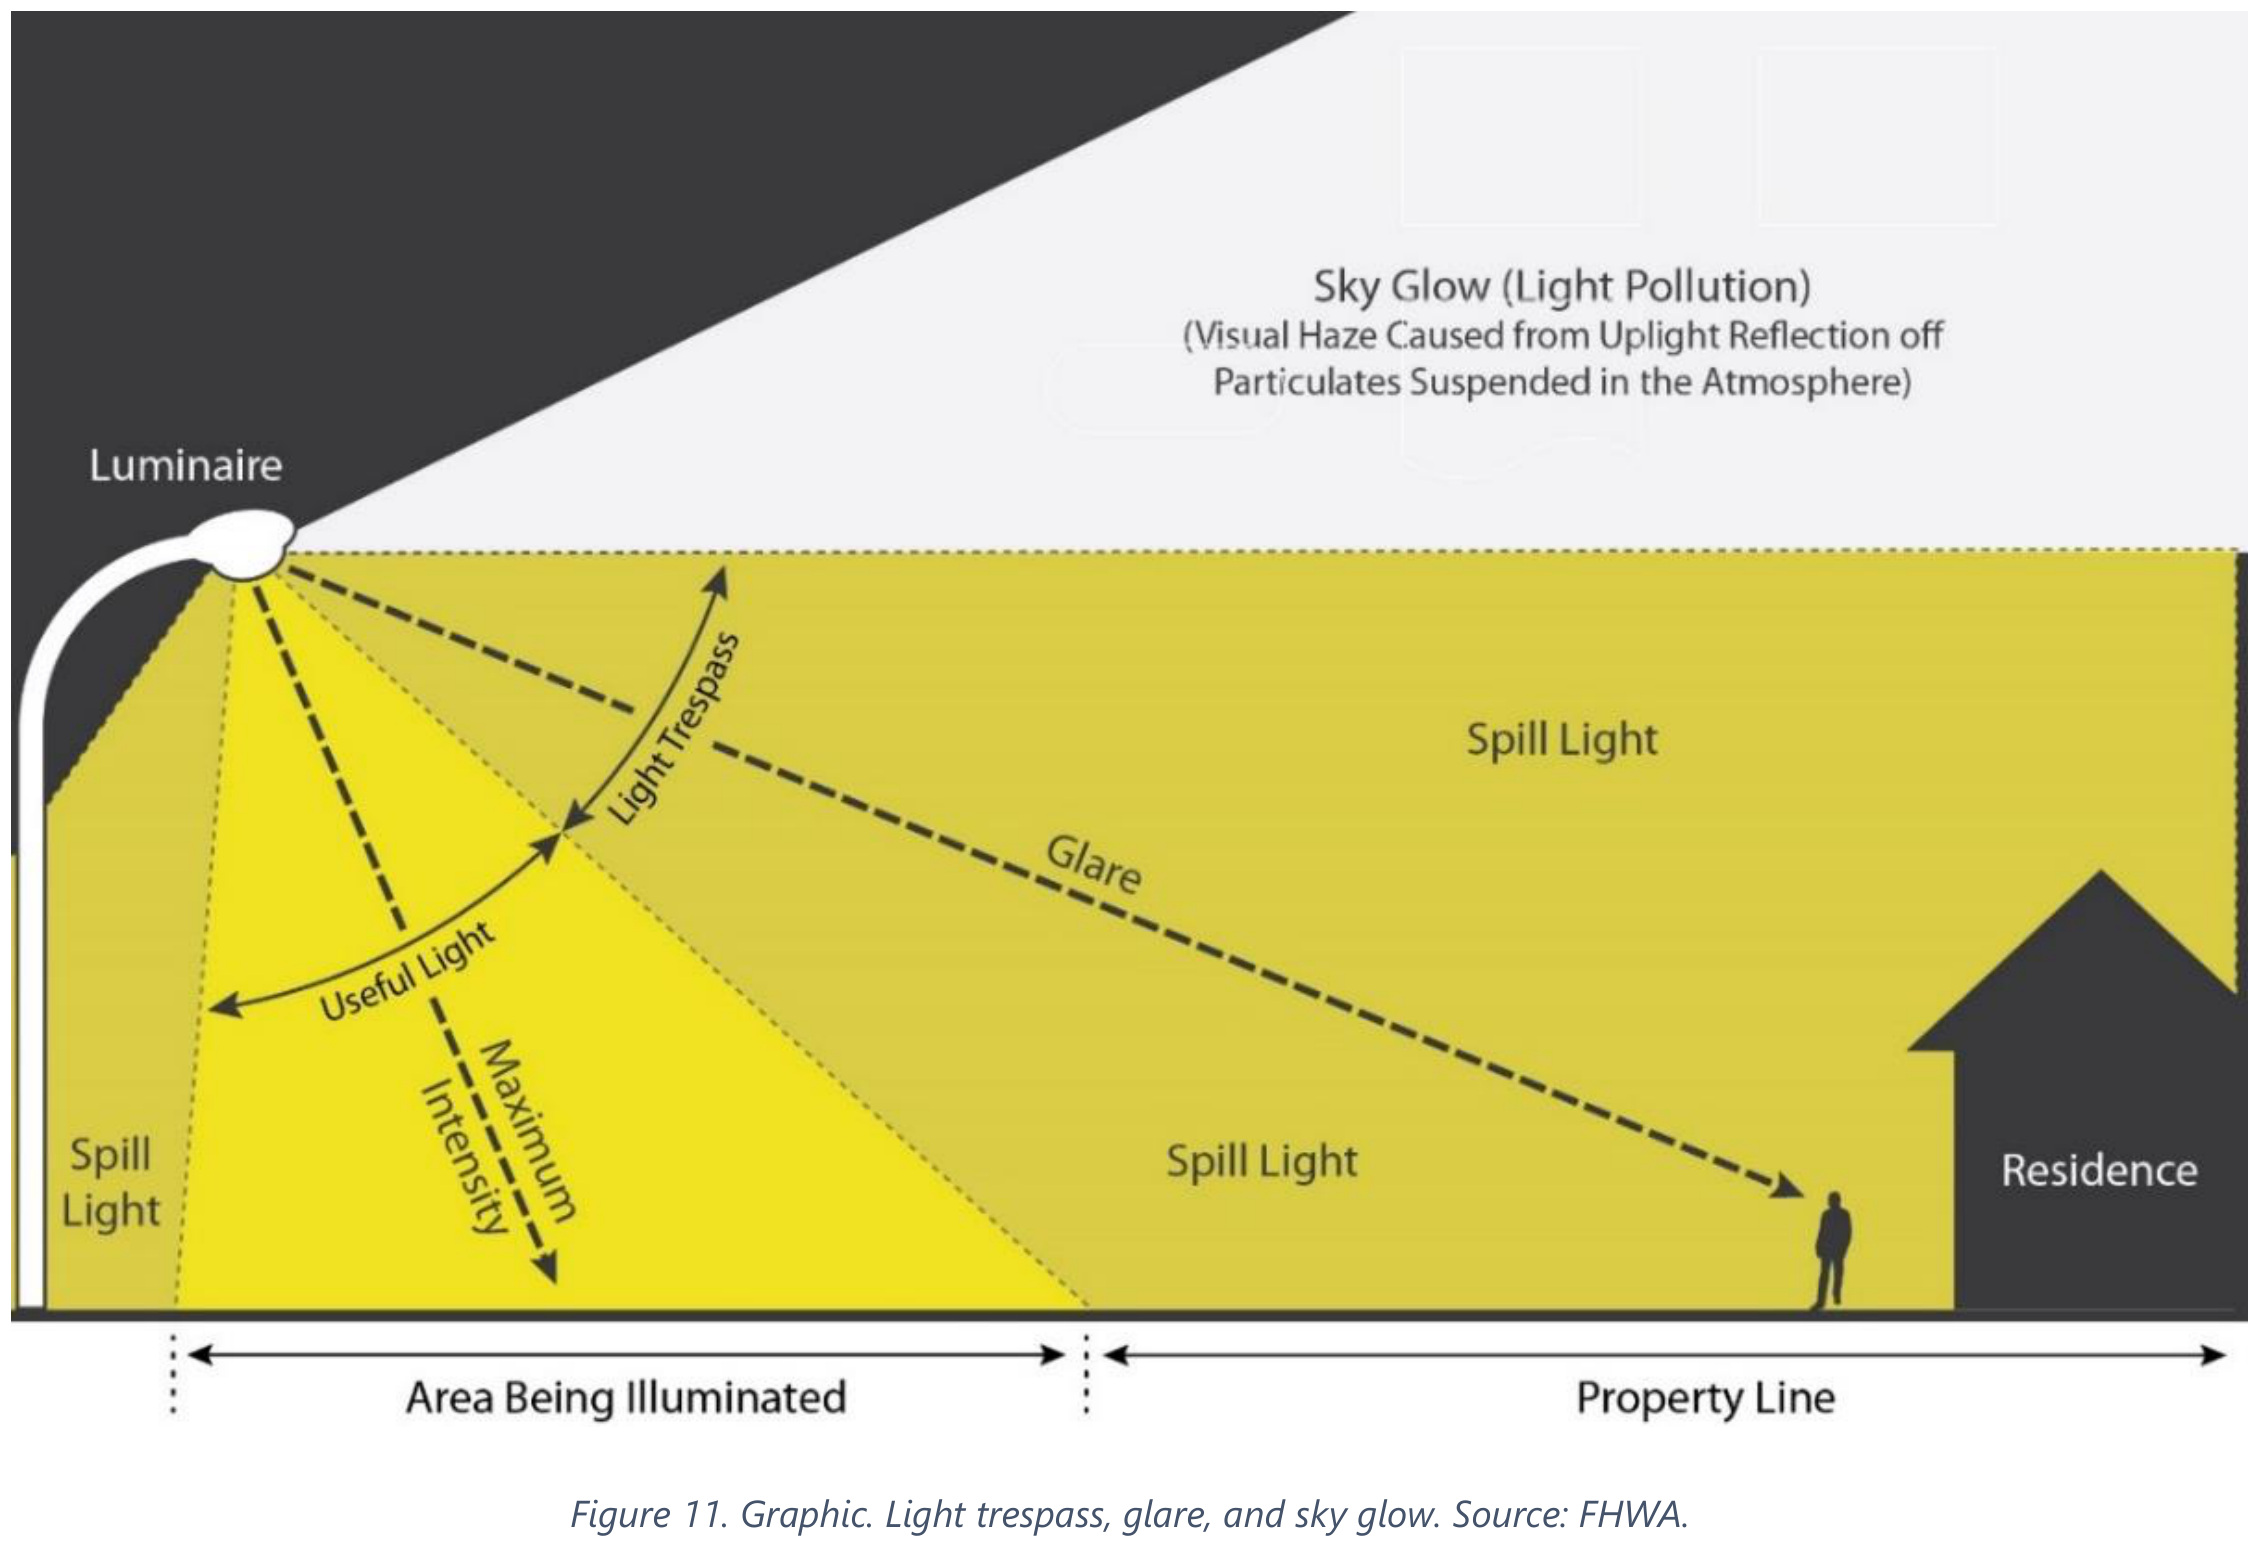
Figure 11 separates useful light, spill, glare and sky glow. A calculation grid inside the site can look satisfactory while a driver or neighbor sees the source directly. Use the diagram to identify the path being discussed, then evaluate the actual luminaire position, distribution and observer view. It is a schematic explanation, not a performance claim for a particular LEOTEK optic.
A photometric model can help assess the distribution on selected surfaces, but the visible luminous source also matters to the observer. Record where a guard, approaching driver or pedestrian can see the light source directly. A change in aiming, mounting or shielding may address a problem that simply lowering or raising total lumens does not resolve.
Pedestrian Lighting Primer discusses contrast and the role of placement in pedestrian visibility. For a security site, apply that visual reasoning through the project's lighting and security review, not by copying roadway criteria into a different task. The applicable property requirements, camera system and observing positions determine the design discussion.
Test a camera as a camera, not as a substitute human observer
Automatic exposure, dynamic range, lens and image processing can change a recorded scene. A camera may respond to a bright source or sign differently from a person standing at the same location. A clear daylight test or an attractive phone image therefore does not settle the nighttime identification task. The actual equipment and approved operating settings need to be part of commissioning.
Consider an illustrative gate with a bright background beyond the entering person. Compare the required approach and stop positions using the actual camera view. Observe whether the task is to detect movement, recognize a person or resolve a more specific identifying detail. Those are different objectives; the security team must define the required outcome rather than asking the lighting team for maximum brightness.
Record the conditions used for the comparison: relevant source states, neighboring light, camera settings and target position. Use an approved test subject or target under the site's procedures. The article supplies a planning method, not a guarantee that a particular camera or luminaire can achieve an identification standard.
A staged design comparison reveals where the next dollar belongs
Start with the required area and operating time. Compare a layout change, optical control and output adjustment while keeping the task and observation positions fixed. If moving or shielding a source improves the useful view, additional power may not be the most productive first intervention. If a necessary surface remains inadequately lit, reducing glare alone may not complete the task. Both findings can be true in one scene.
Retain the selected layout, photometric configuration and control schedule for maintenance. A replacement fixture with a different distribution can change the camera background or habitat-facing spill even when nominal wattage is unchanged. The acceptance record should explain why the selected configuration serves the task so a later repair does not undo the design.
DOE's lighting-quality resource is useful broader lighting-quality context. The project-specific conclusion still needs the actual nighttime review. Effective security lighting is a coordinated viewing system: source, target, background, observer and operating condition. Treating those as connected variables produces a more useful result than purchasing the highest-lumen option and hoping the scene becomes clearer.
Review the person's route through the scene
A security task rarely happens at one fixed point. Someone approaches a gate, crosses a parking aisle and moves toward an entrance. The background, direction of view and source position change along that route. A design that reveals a person clearly at the entrance may leave an earlier decision point poorly supported. Mark the locations where the observer needs to detect, recognize or interpret activity before selecting the calculation views.
For a hypothetical gate review, draw the guard's position and the approach route. Add the direction in which a face or object needs to be seen, and identify bright backgrounds that may compete with that task. The aim is to describe the visual problem. The appropriate illuminance criteria and design recommendations must come from the project's applicable requirements and qualified design review, rather than a universal number borrowed from a different application.
Pedestrian Lighting Primer illustrates the importance of a pedestrian's luminance relationship to the background. Its roadway example supports the principle; it does not establish a private property's security standard. The useful transfer is to ask what the person looks like from the intended observer's position, instead of assuming that brighter pavement establishes better visibility of every relevant object.
Look beyond the first clean, dry commissioning night
A nighttime review captures a set of conditions, not the whole service period. Foliage, surrounding business lighting, dirt and surface conditions can change the scene. Identify the changes likely to matter at this site and establish a reasonable follow-up process. A leafless-season observation, for example, may leave a foliage obstruction question unresolved. Record that limitation rather than implying that one visit settles every seasonal condition.
For comparisons, retain the viewing position and the relevant settings. If dimming, aiming and camera exposure all change at once, the team may see an improvement without knowing which change produced it. Start with the proposed design variables and observe their effect in a controlled sequence appropriate to the project. The resulting record helps maintenance restore the intended scene after equipment is replaced or re-aimed.
Maintenance should also preserve the accepted output and control configuration. Replacing a luminaire with a higher-output option can change glare and background relationships even when the mounting point is unchanged. A service record that says equivalent fixture installed should identify the basis for equivalence. The practical concern is whether the repaired scene continues to support the original visual task.
A camera needs its own evidence of useful detail
Seeing a bright image on a monitor is not the same as resolving the detail the security team needs. Agree on the relevant scene and task with the camera specialist, then evaluate the actual equipment under the intended conditions. Record the settings that materially affect the comparison. Automatic exposure, supplemental illumination and processing can change the result independently of the site's visible-light design.
Keep the human-observer and camera findings together without treating either as a substitute for the other. A change that improves one view may leave the other unresolved. The project brief should describe which tasks were demonstrated, which conditions were observed and what still requires review. That produces a more defensible result than selecting a lumen package first and asking the scene to justify it afterward.
Low-glare security-lighting FAQs
Will a higher-lumen fixture always improve security lighting?
No. First check whether the problem is inadequate task light, glare, aiming, contrast or a poor viewing position. Those conditions can call for different changes.
Why review vertical illuminance?
Ground-plane values alone may not describe the light on faces, signs or other vertical objects. Use the project task to decide which surfaces need evaluation.
Can warm CCT solve glare?
CCT is not a glare measure. Review source brightness, optics, position, aiming and the observer’s view; evaluate spectrum separately where relevant.
Explore LEOTEK outdoor-lighting options. For a project review, include the site plan, observer/camera positions, mounting constraints and operating hours so the discussion starts with the scene you need to see.
Sources and technical basis
Additional research and calculation basis
For a complete placement-and-calculation example, see why more wattage can still miss the crossing, including the original FHWA scenario, pole-location diagrams and three design iterations.